Meta ads have become a powerful tool for businesses to drive growth, generate leads, and increase sales. However, to truly maximize the potential of these ads and ensure a strong Return on Ad Spend (ROAS), it’s essential to not only set up your campaigns correctly but also maintain a strong handle on reporting and managing ad comments. In this blog, we’ll cover how to set up and report on your Meta ads to ensure accurate data and decision-making. We’ll also dive into the importance of monitoring ad comments to keep your campaigns running effectively, even as you scale.

Meta Ads Setup and Reporting: Laying the Groundwork for Success
When it comes to Meta ads, proper setup is critical to ensure your ads are optimized, data is tracked accurately, and your campaigns are poised for success.
Meta Ads Setup: The Importance of Meta Pixel
Before launching your Meta ads, one of the most crucial steps is setting up the Meta Pixel on your website. The Meta Pixel is a small piece of code you add to your website, allowing Meta to track user interactions and conversion events. This pixel plays a central role in tracking key data points such as purchase value, purchases, add to carts, and other important metrics.
Without the Meta Pixel, your Meta Ad account will never receive accurate purchase value or purchase data. This lack of information will severely limit your ability to optimize your campaigns and hinder efforts to achieve a strong ROAS.
Here’s why the Meta Pixel setup is essential:
- Conversion Tracking: The pixel tracks important user actions such as product views, add to cart events, purchases, and more. This data is crucial for understanding user behavior and optimizing your ads.
- Retargeting: With the pixel in place, you can create highly effective retargeting campaigns for users who interacted with your website but didn’t complete a purchase.
- Optimization: Meta’s algorithm uses pixel data to optimize your ads for conversions by showing your ads to people who are more likely to complete the desired actions.
To set up the Meta Pixel, simply follow these steps:
- Go to your Meta Business Manager and select “Pixels” under the Events Manager.
- Create a new Pixel and follow the instructions for installation on your website.
- Once installed, ensure that you’re tracking key events, such as “Add to Cart,” “Purchase,” and “Page View.”
- Verify that the pixel is firing correctly by using the Meta Pixel Helper Chrome extension.
If the Meta Pixel isn’t set up correctly, your campaign’s ability to track and report accurate data will be severely compromised. This means you won’t be able to see the actual performance of your ads, resulting in suboptimal decisions and wasted ad spend.
Meta Ads Reporting: Track the Right Metrics for Success
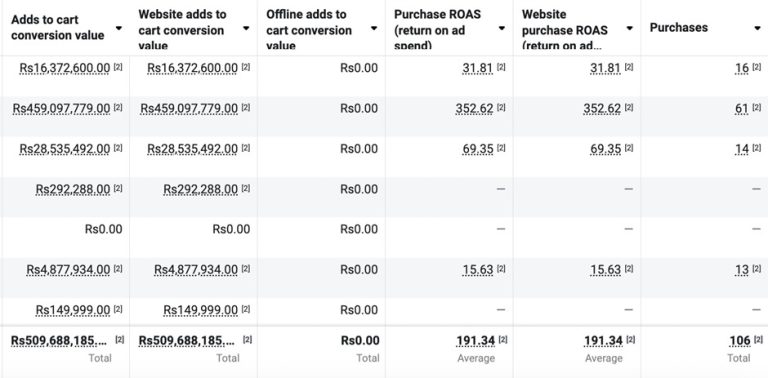
After setting up your Meta Pixel, the next step is to ensure you’re tracking the right metrics in your ad reports. Meta offers a plethora of data points, but focusing on the ones that matter most to your business is crucial.
In the Meta Ads Manager, you can customize your columns to show the most relevant data for tracking ad performance. Here’s how you can ensure that you’re seeing the full picture when it comes to your ads’ effectiveness.
- Purchase and ROAS: One of the key metrics to include in your reporting is Purchases and Return on Ad Spend (ROAS). Purchases give you a count of how many transactions were made, while ROAS tells you how much revenue you generated for every dollar spent. If you’re not tracking these metrics, you’ll have no way of knowing whether your ad spend is generating a positive return.
- Add to Carts: Another important metric to track is Add to Cart. This shows how many users have added products to their cart after clicking on your ad. A high number of Add to Carts with a low purchase rate can indicate a problem with your checkout process or product page, so it’s essential to monitor this.
- Link Clicks: While not directly related to conversions, Link Clicks is a useful metric to track user engagement with your ads. If you’re seeing a high number of clicks but few conversions, it may indicate that your ad creative is compelling, but something is wrong on your landing page or with the audience targeting.
To customize your reporting, follow these steps:
- Go to Meta Ads Manager and click on “Columns” at the top right of your screen.
- Select “Customize Columns” and add metrics like Purchases, ROAS, Add to Carts, and Link Clicks to your view.
- Save the customized report so that you can easily access these insights whenever you review your campaigns.
By customizing your columns to focus on the metrics that matter most, you’ll be able to better understand how your ads are performing and take action to optimize them accordingly.

Managing Ad Comments: Protecting Your Ads from Negative Engagement
As you scale your Meta ad campaigns, you may encounter an issue where a once-successful ad starts to underperform. One often-overlooked factor contributing to this decline is negative comments on your ad creative. Whether it’s unhappy customers, competitors trying to sabotage your ads, or general negative sentiment, these comments can quickly hurt your ad’s performance and cause potential customers to turn away.
The Impact of Negative Comments on Ad Performance
When people see negative comments on your ads, it creates a sense of distrust or doubt about your product or service. This could lead to lower click-through rates (CTR), fewer conversions, and ultimately, a higher cost per acquisition (CPA). Here are some common scenarios that lead to negative comments:
- Customer Complaints: Some customers may leave negative comments about late deliveries, damaged products, or poor service. Even if these issues have been resolved or are rare occurrences, potential customers may see these comments and hesitate to purchase.
- Competitor Sabotage: Unfortunately, competitors may try to undermine your ads by leaving negative or false comments to hurt your brand’s reputation.
- Misinformation: Users may leave comments based on misunderstandings or misinformation, further discouraging others from engaging with your ad.
How to Handle Negative Comments
Managing the comments on your ads is crucial to maintaining the effectiveness of your campaigns. A best practice is to check your ad comments at least once a day to stay on top of any negative sentiment before it spirals out of control.
Here are some actionable steps for handling negative comments:
- Do Not Respond Publicly: It’s tempting to reply to negative comments to defend your brand, but this can often make the situation worse and draw more attention to the issue. Instead, you should privately message the user on Messenger to resolve their concern.
- Delete Negative Comments: Once you’ve messaged the commenter privately, delete their comment from the ad. This prevents the negativity from influencing other potential customers.
- Engage with Positive Comments: Be proactive in engaging with users who leave positive comments on your ads. Replying to these comments can build social proof and encourage others to trust your brand.
By regularly monitoring your ad comments and swiftly addressing negative feedback, you can maintain a positive brand image and keep your ad performance high.
Optimizing for Scale: Why Ad Creatives Can Fail as You Scale
As you begin to scale your Meta ad campaigns, you may notice that a once-successful ad starts to fail. There are several reasons why this happens, but one of the most common is the accumulation of negative comments, as we discussed earlier. However, scaling also introduces new challenges, such as audience fatigue and increased competition.
Audience Fatigue
When you scale an ad, it’s likely being shown to a larger and more diverse audience. While your original target audience may have responded well, this broader audience might not engage with the ad in the same way. Additionally, if the same users see your ad too frequently, they may become tired of it, leading to reduced engagement and performance.
Increased Competition
As you increase your ad budget, you’re entering more competitive auctions, which can drive up your costs. If your ad creative isn’t compelling enough to stand out in these more competitive spaces, its performance can drop.
To prevent these issues:
- Rotate Creatives: Frequently update your ad creative to avoid audience fatigue. Test different versions of your ad and introduce new visuals and messaging to keep it fresh.
- Broaden Your Audience: As you scale, consider broadening your audience slightly to capture new segments. However, make sure this doesn’t dilute the effectiveness of your targeting.
- Monitor Competitors: Keep an eye on what your competitors are doing. If they’re targeting the same audience as you, it’s important to differentiate your ads to maintain an edge.
Conclusion: Setting Yourself Up for Meta Ad Success
Optimizing your Meta ads for maximum ROAS requires a combination of proper setup, diligent reporting, and active management of your ad comments. By setting up your Meta Pixel, customizing your reporting metrics, and staying on top of negative comments, you can ensure that your campaigns remain profitable as you scale.
Remember, the key to long-term success with Meta ads is continuous optimization and monitoring. As the platform and user behavior evolve, so should your approach. Start today by auditing your ad setup and performance, and take control of your campaigns to drive better results and higher ROAS.
If you’re looking for more advanced strategies or need help managing your Meta ads, reach out to us at growth@hotROAS.com

